

Multi-dimensional scaling
-
There are two ways to start a multi-dimensional scaling:
-
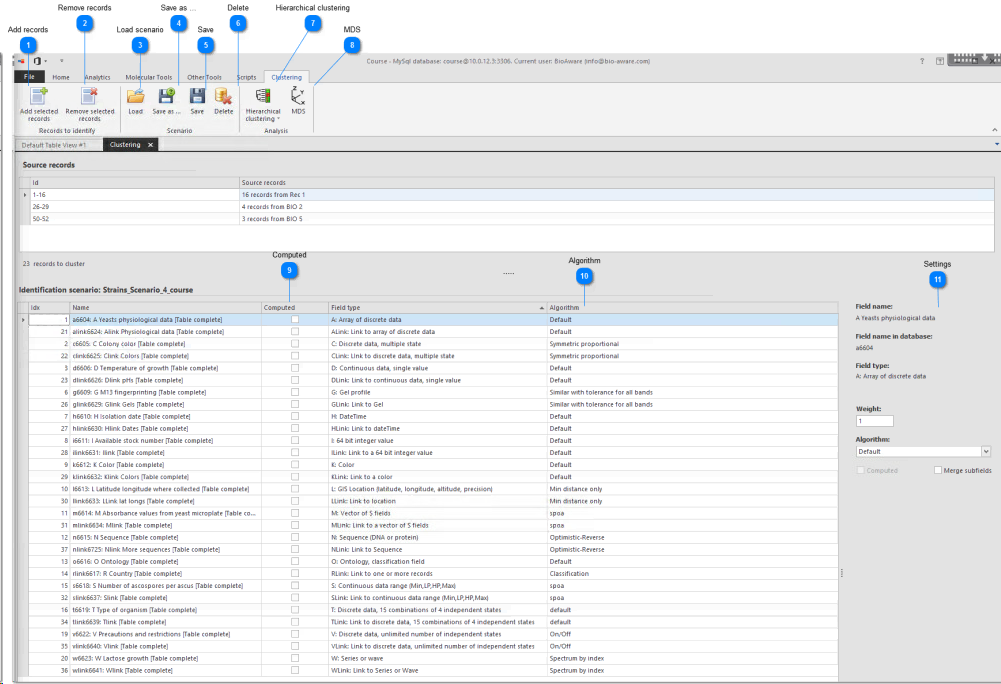
Under Analytics, in the Classification group, click Polyphasic clustering.
 Then in the Clustering tab, add the records using the Add selected records button.
 -
In the main window of BioloMICS, in the BioSheet, select the record(s) to use for the clustering.Right-click on one of the selected records > Transfer record(s) to clustering.
2. Include the fields that contain data to be used.
3. Set parameters at the bottom right.
At the bottom right you can set the values for the selected field(s).
When multiple fields are selected then only the data in common are shown, otherwise a - is displayed.
-
Title This text will be visible on top of the clustering tree (tab name) as well as at the bottom of the matrix grid (sheet name).
-
Field name Name of selected field as displayed to the end-user
-
Field name in database Name of the selected field as stored in the database
-
Field type The type of field including the description
-
Weight A real number multiplying the given field similarity. A value of ‘2’ duplicates the importance of the given field in the final identification. A value of 0.25 divides it by 4.
-
Algorithm Depending on the type of field, different algorithms are available. Please check the algorithms sections of the character/field descriptions (Field types) to understand the way the software works. A different algorithm could strongly affect the final result.
-
Computed Check to include the fields for the computation.To include or exclude multiple fields in the same time, select them all and set the value in to either include or exclude using right-click.
-
Merge subfields Merge subfields (only for A, C and M fields). More...
-
Target table For link fields only. The name of the table where the field is pointing to.
-
Target records processing For link fields only. Choose the way the target records are processed (undefined, best, worst, average).When comparing parent records on the basis of the attached or linked records such as DNA sequences and when there is more than 1 record attached, 3 options are available:1. Best (default): where the similarity of the most similar pairs (of DNA sequences, for example) of target records values is kept.2. Average: where the average similarity of all the pairs (of DNA sequences, for example) of target records values is used.3. Worse: where the similarity of the least similar pairs (of DNA sequences, for example) of target records values is kept.
-
Max number of target records For link fields only. When the number of target records should be limited. In some case, it is interesting to use only the first target records, with respect to the order they appear in the main BioloMICS window.
-
Target field For specific link fields only. The field in the target table that is used to point to.
4. Click Save as to save the clustering scenario (optional) or Load to load a previously saved one.
5. Click MDS to start.
Note: the result of large selections of records can be time consuming, especially on slow computers or on the ones not having enough RAM.
* For a detailed description on each of the buttons and settings as shown on the picture below, see Agglomerative clustering.
This movie shows how to perform an agglomerative clustering tree using Multi Dimensional Scaling (MDS).
1. Select records - transfer to clustering (0:09)
2. Include/exclude fields (0:40)
3. Choose algorithm (0:53)
4. Set weight (1:03)
5. Set tolerance (1:09)
6. Choose options target records (1:20)
7. Merge subfields (1:36)
8. Save/load scenario (1:56)
9. Start MDS (2:05)
10. Display extra fields (2:21)
11. Colorize datapoints (2:41)
12. Show label (2:57)
13. Zoom (3:11)
14. Size and shape of bubbles (3:21)
15. Show statistics (3:38)
16. Save 3D image (3:48)