

Add new field to a table
Only administrators and super-administrators can modify the structure of tables.
-
Click on File to go to the backstage section, select Database and click Edit fields.
-
Select the table into which a new field must be added from the Select table dropdown list. The list of existing fields will be provided.
-
Click Add to add a new field to the current table. A multiple step wizard will be opened.
-
Step 1: New field details.Enter the field name, select the field type and enter a comment (optional).

-
Field name This is the name that end users will see and use.
-
Field type The Field type is an important feature that will decide about the type and therefore about the properties of the field.Before describing all field types, it is necessary to understand that two different kinds of fields exist:1. Normal fields containing data.2. Field links that are pointers to a field located in another table.For example, if a single DNA sequence must be stored, an N-Field is the right choice. But if multiple sequences must be stored, an N-Link field is used to point to an N-Field located in a target table.The following types are available to choose from: (click on the field type to see an example how to create a such field)Field typeExplanationVector of discrete data (results from [-, +, weak], DNA chips etc.)Link to vector of discrete data AVector of discrete data, 4 possible states each (unknown, variable, absent, present)Link to vector of discrete data CContinuous data, single valueLink to continuous data, single valueText, administrative fieldLink to text, administrative fieldFile content (blob field containing any file type - pictures, trace files, Word doc, Excel doc, etc.)Link to a File (- pictures, trace files, Word doc, Excel doc, etc.)Molecular weight from electrophoresis analysisLink to Molecular weight series in another tableDate and TimeLink to date and timeInteger (32 or 64 bits)Link to integerColor fieldLink to colorGIS location (latitude, longitude, precision)Link to a GIS locationArray of continuous data (absorbance values from microplates, DNA chips, etc.)Link to array of continuous data MDNA or protein sequenceLink to a sequence in another tableOntology, a structured classification valueLink to an ontology field located in another tablePointer to multiple records, link between tables using record IDsContinuous data range (min, low and high percentile, max)Link to continuous data rangeManagement of the current name basionym, taxonomic and obligate synonymsLink to Syn field located in another tableSingle discrete data representing the combinations of 4 basic states (A, B, AB, C, AC, etc.)Link to single discrete data TURL, hyperlink to websitesSingle discrete data representing an unlimited number of statesLink to single discrete data VList of paired valuesLink to a list of paired valuesA summary field displaying data from other fields
-
Comment Can be used to explain how the creator of the database understands the way data should be observed, entered or analyzed. The text entered here will also be used on the website to help Internet users (in case the table and field are made available via the Internet).Click Next to go to the next step.
-
Step 2: Choose field codes and options.The Column name of new field will be automatically provided and cannot be changed.Depending on the type of field, the Advanced options button could be used and will propose a number of options (default, minimum, maximum values, names and number of states, etc.) that, again, will depend on the type of field.The possible options are in detailed described in Specific features tab of each field type in the Field types.
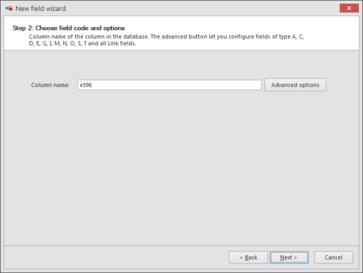 Click Next to go to the next step.
 -
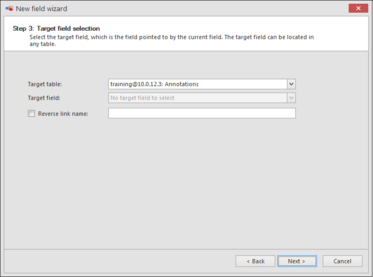
When a link field is selected then the next step will be to select the target details.
-
Target table Select the table where the new field is pointing to. For example an NLink field has as target table 'Sequences' because it contains an N field.
-
Target field Select the field to link to.For example, when creating an FLink field, all F fields present in the Target table will be displayed. As a second example, when creating a GLink field, all G fields available from the Target table will be displayed.An XLink field is a field in the mother table that points to a target X field in the child table.
-
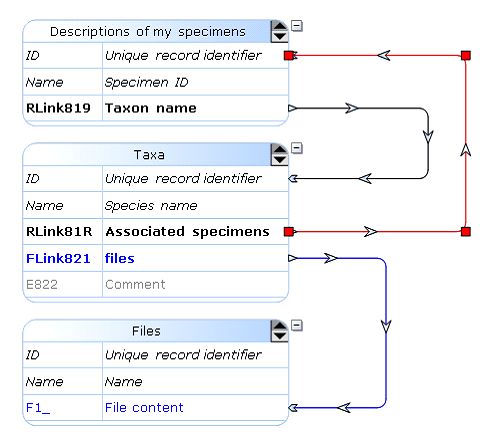
Reverse link Will make an automatic link back. This option is available for all link fields.Check the checkbox when a reverse link field should be created in the target table.Enter the name of the new field that will be added to the target table pointing the current table.The sample schema below illustrates the concept of linking fields between tables.We have here 3 tables: Descriptions of my specimens (T1), Taxa (T2) and Files (T3).RLink819 (Taxon name) is a record link that links records of T1 to records of T2. The associated link is displayed in black color.RLink81R (Associated specimens) is a record link that links records of T2 to records of T1. The associated link is displayed in red color. Note that in this case field RLink81R is a Reverse record link field of field RLink819. In the example below, it will allow to associate a specimen of T1 to the species record of T2 but also to do an automated reverse linking (species records from T2 to specimens’ records of T1).When one of the links is changed the reverse link is automatically updated as well. For example, if a specimen A is associated/linked with/to species B, then species B is also associated/linked with/to specimen A.FLink821 (T2) is a file link field that points to field F1_ (File content – T3) and is represented by a blue arrow in the schema below. F1_ is the Target field.
 Click Next to go to the next step.
 -
Provide group's access rights.
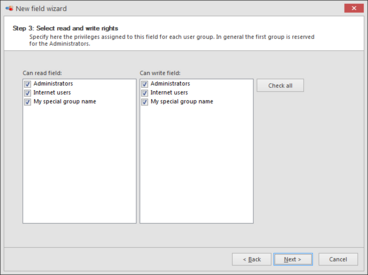 Click Check all to provide rights to all groups.Click Next to go to the next step and to complete the wizard.
This movie shows how to create a new field in BioloMICS.
1. Backstage - Edit fields (0:12)
2. Select table (0:22)
3. Add new field (0:33
4. Give name of new field (0:38)
5. Select field type (0:47)
6. Advanced options (1:05)
7. Assign rights (1:35)
8. Add link field (1:57)
9. Select target table and field (2:47)
10. Save changes (3:33)
This movie shows how to create a new field in BioloMICS for all the field types.
• A field (0:19)
• ALink field (0:48)
• C field (1:16)
• Clink field (1:44)
• D field (2:15)
• DLink field (2:37)
• E field (3:08)
• ELink field (3:37)
• F field (4:07)
• FLink field (4:24)
• G field (4:56)
• GLink field (5:50)
• H field (5:52)
• HLink field (6:10)
• I field (6:40)
• ILink field (7:04)
• K field (7:37)
• Klink field (7:54)
• L field (8:30)
• LLink field (8:52)
• M field (9:28)
• MLink field (9:56)
• N field (10:36)
• NLink field (11:01)
• O field (11:34)
• OLink field (12:02)
• R field (12:36)
• S field (13:08)
• Slink field (13:35)
• Syn field (14:11)
• SynLink field (14:44)
• T field (15:19)
• TLink field (15:54)
• U field (16:29)
• V field (16:46)
• VLink field (17:17)
• W field (17:53)
• WLink field (18:11)
• Y (18:46)